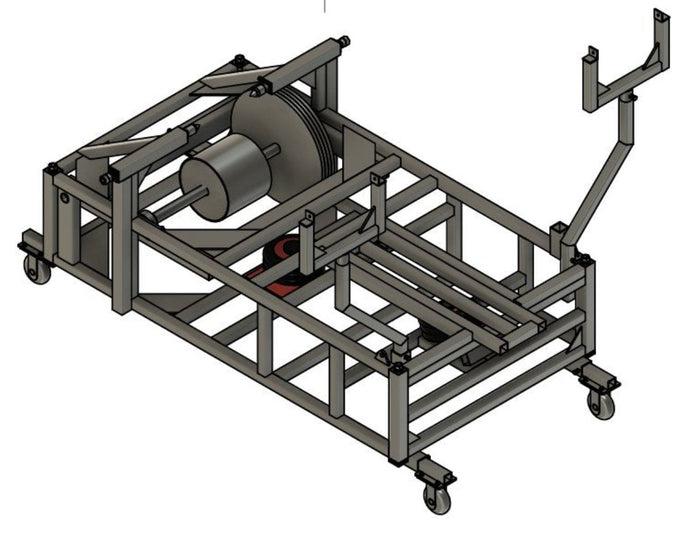
Yes — a wheelie machine for pit bike riders works, and a pit bike is one of the easiest bikes there is to learn wheelies on. The adjustable mount and back roller set to a pit bike's short wheelbase, the safety straps stop it looping, and you get unlimited safe reps in your own garage. You can build one yourself from $59 plans and locally sourced parts.
Why pit bikes and wheelie machines go together
A wheelie machine for pit bike training makes sense for one simple reason: pit bikes are already the easiest bikes to learn wheelies on. In our bike-by-bike comparison they rate easiest of every type — small, light and low, with gentle power that gives you time to react. A machine takes away most of the risk that's left.
The problem with learning on a pit bike outside isn't the bike. It's the reps. To own the balance point you need hundreds of attempts, and every one of them in a paddock or a car park is a chance to loop it, drop it or hurt a wrist. Small bikes are cheaper to fix than big ones, but they're not free, and neither is your collarbone. On a rig, the only limit on reps is how long you want to train.
How a wheelie machine for pit bike training works
The bike sits on an adjustable attachment that grips the hollow rear axle. The rear wheel drives a roller, so it spins freely while the bike stays put. As the front lifts, the airbag sprung ramp cushions the front wheel and boosts the bike toward the balance point, and the anti-loop safety straps set the limit of how far it can go.
You use the pit bike's real controls the whole time — throttle, rear brake and, if your bike has one, the clutch. That's what makes the skill transfer. You're not learning a simulator; you're learning your own bike. If the whole idea is new to you, start with what a wheelie machine is and how it works.
Setting the rig up for a pit bike
The same machine that holds a full-size Harley holds a pit bike. The difference is all in the settings. The multi-bike fitment guide in the plans covers small bikes, but the basics are:
- Check the axle first. The mount grips a hollow rear axle, so confirm your pit bike has one before you start.
- Set the wheelbase. Pit bikes are short. Slide the adjustable back roller to suit, and write the setting down so you can repeat it every session.
- Start with short straps. For your first sessions, set the anti-loop straps so the bike stops well before the balance point. Lengthen them as your control improves.
- Run the ramp soft. The airbag sprung ramp can be run softer while you learn and firmer once you're confident.
- Fans on, every time. A stationary bike gets no airflow, and small air-cooled engines heat up quickly when they're standing still. Run the cooling fans for the whole session.
- Drop the jack stands. The rig should sit dead flat on the ground before you start. No rocking, no creeping.
No clutch lever? You can still train
Some pit bikes have a manual clutch. Others have a semi-automatic gearbox with no hand clutch at all. Both work on the machine — they just teach slightly different lifts.
With a clutch, start with clutch wheelies: a small, smooth slip and a little throttle gives you the most predictable, repeatable lift. Without one, you're learning power wheelies — a smooth roll of the throttle, with your body weight helping, to bring the front up. Out in the open, a power wheelie is harder to control when you're new. On a rig with the straps set short, it's a safe way to learn the feel. Our guide to clutch vs. power wheelies explains the difference in detail.
A first-session plan for pit bike riders
Don't jump straight to long holds. Build it in stages, and only move on when the current stage feels boring.
Ready to build one?
Skip the guesswork — get the complete step-by-step build plans.
Get The Plans — $59- Brake reflex. Lift the front a few inches and tap the rear brake to set it down. Repeat until covering the brake is automatic — it's your undo button. More on that in why the rear brake is your #1 safety tool.
- Smooth lift. In a low gear, bring the front up with a clutch slip or a smooth roll of throttle. Learn how much is enough and how much is too much.
- Find the point. Lengthen the straps a little and lift until the bike feels weightless in your hands. That's the balance point.
- Hold with small inputs. Tiny throttle to bring it up, tiny brake to bring it down. Smooth, not aggressive.
- Set it down clean. Practise the landing as much as the lift. A controlled set-down protects your fork seals and your wrists.
Stage three is the one that changes everything. Once you've felt the balance point a few hundred times, it stops being scary and starts being familiar. We break that moment down in how to find the balance point.
A pit bike makes wheelies easy to start. The machine makes them safe to repeat.
Pit bike quirks to watch for
Small bikes are forgiving, but they have a few habits worth knowing about before you strap one in:
- Your weight matters more. On a light bike, the rider is a big share of the total weight. Shifting back or forward moves the balance point more than it would on a heavy bike, so stay centred and relaxed.
- Low gearing lifts easily. A pit bike can loft the front with less input than you expect. Roll on gently — don't stab it.
- Tight cockpits. Adults on small bikes sit cramped. Make sure you can reach and cover the rear brake comfortably before every session, not just the first one.
- Heat builds fast. Small engines get hot quickly when stationary. On long sessions, take breaks and keep the fans running throughout.
Most of the riding errors that stall progress — stabbing the throttle, riding stiff-armed, forgetting the brake — are the same on any bike. Our list of 7 common wheelie mistakes is worth reading before your first session.
One rig for every bike in the shed
If you've got more than one bike in the shed — or younger riders coming up on smaller ones — one machine trains everyone. The adjustable mount and back roller handle anything from a small pit bike up to a full-size dirt bike, supermoto, street bike or Harley. You change the settings between riders and go again.
A young rider must always be supervised by an adult and wear full protective gear, every session, without exception. Keep the straps short while they learn. The machine stops the bike looping, but they're still sitting on a running motorcycle with a spinning rear wheel. Our guide to a wheelie machine for kids covers the full set of rules and a first session.
Space, gear and ventilation
A pit bike is small, but the rig still needs a flat, solid floor — a concrete garage slab or driveway — with room in front for the front wheel to lift and room behind for the roller. The jack stands need firm ground, so avoid grass and gravel.
You'll be running the engine for long stretches, so train outside or with the garage door wide open. Never run a bike in a closed space where exhaust fumes can build up. And wear the same kit you'd ride in: helmet, gloves, boots and a jacket or jersey.
From the machine to the dirt
When the lift, the balance point and the rear-brake tap all feel automatic on the rig, take it outside. Pick a flat, open, legal spot with good traction, stay in a low gear and keep the first attempts short and low. It should feel familiar straight away, because the inputs are identical — same bike, same controls, same balance point. Any time something feels off, go back to the machine and drill it again.
When you're ready to move up to a bigger bike, our guide on how to wheelie a dirt bike and the dirt bike wheelie trainer setup take it from there — on the same rig.
Build your own pit bike wheelie trainer
Commercial machines from other sellers are often one size and not adjustable, and freight is extra. Building your own wheelie machine costs $59 for the plans plus around $1,500 in materials, depending on your local prices, and most people finish in a weekend with a welder, grinder, drill and hammer. No welding degree, no CAD. Our step-by-step build overview shows what's involved, and the dimensions and plans guide explains why one set of measurements fits so many bikes.
The complete build plans include step-by-step PDF instructions, detailed blueprints with exact measurements, a full materials list, a multi-bike fitment guide and printable workshop diagrams. They download instantly, include lifetime updates and are backed by a 6-month money-back guarantee. More than 100 machines have been built from them.
The bottom line
A pit bike is the easiest bike to learn wheelies on, and a wheelie machine makes it the safest too. Set the rig to your wheelbase, start with the straps short and rep the balance point until it's automatic. Grab the build plans and start building your small bike wheelie machine this weekend.
Frequently asked questions
Will a wheelie machine fit my pit bike?
Yes. The adjustable mount and back roller handle pit bikes right up to full-size bikes — you just set them to your wheelbase. The main thing to check is that your pit bike has a hollow rear axle, because that's what the mount grips.
Can I train on a pit bike with no clutch lever?
Yes. On a semi-automatic pit bike you'll be learning power wheelies, using a smooth roll of the throttle to lift the front. With the straps set short, the machine makes that a safe way to learn the feel. If your bike does have a clutch, start with clutch wheelies.
Is a pit bike good for learning wheelies?
It's one of the best. In our bike-by-bike comparison, pit bikes rate as the easiest type to learn on because they're small, light and low with gentle power. A machine makes them even safer to learn on.
Will my pit bike overheat on the machine?
Not if you run the cooling fans. A stationary bike gets no natural airflow, and small air-cooled engines heat up quickly when standing still. Keep the fans on for the whole session and take breaks during long ones.
Do I need welding or engineering experience to build it?
You'll need a welder, but not advanced skills — if you can join two pieces of steel, the step-by-step drawings cover the rest. You'll also need a grinder, drill and hammer.
Build your own wheelie machine
Put this into practice. Get the complete DIY plans — instant download, fits any bike, 6-month guarantee.
See The Plans →