Learning wheelies on the street is the expensive way to do it. A dedicated trainer gives you unlimited reps at the balance point with zero chance of looping out. Here's how one works, what it fits, and why most riders are better off building their own.
What the rig actually does
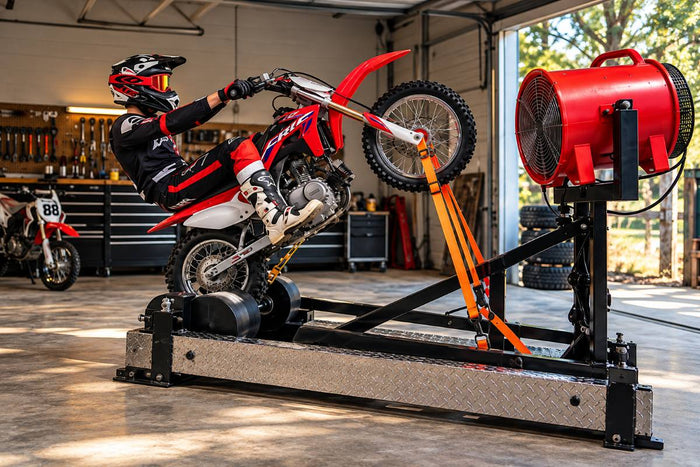
A trainer holds your bike in one place while the rear wheel spins on a roller. You use your real throttle, clutch and rear brake exactly like you would on the road — but the front end can only lift as far as the rig allows. Go too far and the machine catches you. Get it right and you can sit at the balance point for as long as you like. It's also known as a motorcycle wheelie simulator.
That's the whole trick. Wheelies aren't about guts; they're about finding one balance point and training your body to hold it. On the street, every attempt is a gamble. On a trainer, every attempt is a rep. If the concept is new to you, start with what a wheelie machine is and how it works.
Why riders stop learning on the street
- One loop-out is expensive. Bent subframe, smashed plastics, broken levers — easily $2,000+ before you count your own injuries.
- There's nowhere to practise. Car parks move you on and the street earns you tickets. You need reps, not a record.
- Fear kills progress. When every attempt could end in a crash, you never commit long enough to feel the balance point. You bail early, every time.
A trainer removes all three problems at once. The bike stays in your garage, the cost of a mistake drops to zero, and you can repeat the same movement until it's automatic.
The parts that make it work
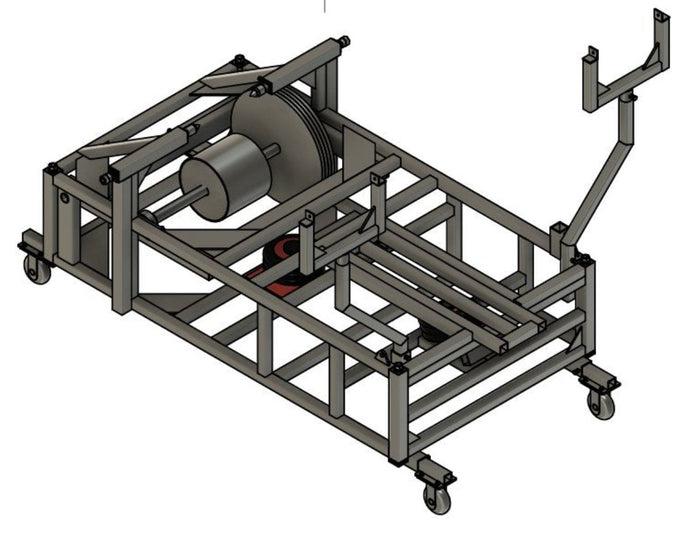
Every serious motorcycle wheelie machine is built around the same handful of systems. Ours has six:
- Adjustable bike attachment — a universal mount that grips any hollow-axle bike, from pit bikes to full-size Harleys. No custom fabrication.
- Airbag sprung ramp — cushions the front wheel on the way down, protects your fork seals and boosts the bike up toward the balance point.
- Adjustable back roller — dial it to your wheelbase in seconds, with repeatable settings for every bike and every rider.
- Drive motor and cooling — high-powered fans and tuned airflow keep your engine cool through back-to-back sessions, because a stationary bike gets no natural airflow.
- Jack stands and safety straps — the stands keep the rig dead flat on the ground, and the anti-loop straps stop the bike going over while you build muscle memory.
- Heavy-duty casters — removable industrial wheels so you can roll the whole rig around the garage or out to an event on your own.
Skip any one of these and you've built something less safe. That's why accurate plans matter — the safety systems are designed in from the start, not bolted on as an afterthought. We go deeper on this in are wheelie machines safe?
Ready to build one?
Skip the guesswork — get the complete step-by-step build plans.
Get The Plans — $59Will it fit my bike?
Almost certainly. The adjustable design fits pit bikes, dirt bikes, supermotos, street bikes and full-size Harleys — you just set the mount and back roller to your wheelbase. The main thing to check is that your bike has a hollow rear axle, because that's what the mount grips.
Some bikes are easier to learn on than others. Light, torquey bikes lift the front with very little effort, while heavier sport bikes with aggressive geometry take more finesse. On a properly built wheelie trainer for motorcycle riders of any level, that difference matters a lot less — the rig catches the bike either way. Our guide to the best bikes for learning wheelies breaks it down by type.
How a training session runs
- Set up. Roll the rig into place, drop the jack stands, and set the mount and back roller for your bike.
- Strap in. Attach the safety straps and set them so the bike physically can't pass the balance point.
- Cover the rear brake. Before anything else, get your foot over the brake. It's your undo button — a light tap drops the front instantly.
- Lift gently. Use a small, smooth clutch slip and a little throttle to bring the front up toward the balance point. Roll it on — don't stab it.
- Hold and correct. Tiny throttle to bring it up, tiny brake to bring it down. That's the entire skill.
- Rep it out. Set it down and go again. Repetition is what turns a scary movement into an automatic one.
Riders pick up the feel on the machine in minutes — reps that would take months and a pile of broken parts on the street. For the technique side, read how to find the balance point and why the rear brake is your #1 safety tool.
Where to set it up
You need a flat, solid floor — a concrete garage slab or driveway — with room in front for the front wheel to lift and room behind for the roller. The jack stands need firm ground, so avoid grass and gravel. You'll be running the engine for long stretches, so train with the door open or outside, never in a closed space where exhaust fumes can build up. And wear your riding gear: the rig stops the bike looping, but you're still on a running motorcycle.
Every rep on the trainer is a rep you didn't have to risk your bike for.
Buy one or build one?
Commercial rigs exist, and they work. Commercial machines from other sellers are often one size and not adjustable, and freight is extra. A pro training school is the other option at $300+ a day, and a few sessions cost more than the rig itself.
Building your own motorcycle wheelie trainer is the third way. You buy the plans once, source the steel and parts locally, and build it in a weekend with a welder, grinder, drill and hammer — no welding degree, no CAD. Expect around $1,500 in materials, depending on your local prices. When you're done you own the machine outright, train whenever you want, and can even rent sessions out to other riders. Our DIY vs. buying cost breakdown runs through the numbers.
| Option | Cost | What you get |
|---|---|---|
| Other commercial machines | Fixed & pricey | Fixed setup, freight, long wait |
| Crash your own bike | $2,000+ | Repair bills and real risk |
| Pro training school | $300+/day | A few sessions, nothing to keep |
| Build your own | $59 plans + around $1,500 in materials | Yours forever, fits any bike |
What's in the plans
Our build plans are an instant PDF download: step-by-step build instructions, detailed blueprints with exact measurements, a full materials list sourced from common local suppliers, a multi-bike fitment guide and printable workshop diagrams. You also get lifetime access to every future revision. More than 100 machines have been built from them, and they're backed by a 6-month money-back guarantee.
The bottom line
If you want to learn wheelies without wrecking your bike, the fastest path is to train the balance point on a rig first and take the skill to the road second. A motorcycle wheelie trainer makes that possible in your own garage. Grab the complete build plans and start building this weekend.
Frequently asked questions
Can I use one on a heavy street bike?
Yes. The adjustable design fits everything from pit bikes to full-size Harleys. Heavier bikes take more finesse to lift, but the straps and back roller catch them exactly the same way.
Do I need welding or engineering experience to build it?
You'll need a welder, but not advanced skills — if you can join two pieces of steel, the step-by-step drawings cover the rest. You'll also need a grinder, drill and hammer.
How fast will I learn on a trainer?
Most riders feel the balance point within minutes on the machine. Holding steady, controlled wheelies comes with reps — and on a trainer you can do as many as you like without risking a crash. See how long it takes to learn to wheelie.
Build your own wheelie machine
Put this into practice. Get the complete DIY plans — instant download, fits any bike, 6-month guarantee.
See The Plans →